Creating a dynamic list with RecyclerView in Android: A Beginner's guide
Awareness of the fundamentals of RecyclerView in Android Development


What is a RecyclerView?
RecyclerView is a ViewGroup used to efficiently display large clusters of data either in a list or grid layout. As a successor of both the GridView and ListView, it offers better performance and control. It operates through the recycling of components. For instance, when a user scrolls off an item from the screen, the RecyclerView doesn't destroy its view but reuses it for a new item.

RecyclerView Structure
Three sub-parts make up the RecyclerView. When constructed, they offer control to the users for varying design choices.
The Item Layout: This is an XML layout file that defines each view item.
The Data Class: This is a model class that acts as a source of data for the RecyclerView.
The Adapter and Viewholder: The Adapter acts as a bridge between the data and the RecyclerView. It manages the data and binds views to each data. While the Viewholder is a Java class that holds a reference to the views for items in the RecyclerView. It acts as a cache for views and allows for efficient recycling and reusing of views.
For the sake of this guide, it is inferred that the reader already has a fundamental knowledge of the Kotlin programming language and the use of Android Studio.
Implementing the RecyclerView: A step-by-step approach
Implementing the RecyclerView can get confusing but in this guide, we will walk through the steps of creating dynamic lists using the RecyclerView in Android by learning how to create an Adapter class, custom layout, model class, and handle item clicks. For our RecyclerView, We will show a list of usernames and ages.
Setting up the project
Creating the RecyclerView layout
Creating the Adapter
Populating data and binding views
Handling item clicks
Setting up the project
Let's begin by creating a new project in Android Studio in order to get started. Select the Empty Activity template, give it a creative name, and choose Kotlin as the programming language.

After doing so, add the most recent dependency for the RecyclerView in your app-level build.gradle file.
dependencies {

    implementation("androidx.recyclerview:recyclerview:1.2.0")
   // Rest of your app dependencies....
}
Creating the RecyclerView layout
Next, open your activity_main layout resource file and replace the existing TextView with a RecyclerView. You have the option to configure the Layout Manager for your RecyclerView either within the XML file or in the MainActivity class. The choice of Layout Manager determines the visual appearance of the RecyclerView, such as whether it should be displayed as a grid or a list.
<FrameLayout xmlns:android="http://schemas.android.com/apk/res/android"
   android:layout_width="match_parent"
   android:layout_height="match_parent"
   xmlns:app="http://schemas.android.com/apk/res-auto">

   <androidx.recyclerview.widget.RecyclerView
       android:id="@+id/recycler_view"
       android:layout_width="match_parent"
       android:layout_height="match_parent"
       app:layoutManager="LinearLayoutManager"/>
</FrameLayout>
And do not forget that we still need to create the Item Layout. As mentioned, this layout is responsible for defining the view of each item in the RecyclerView.
Create a new layout resource file with the name of user_item. Add two TextView, one for the username and the other for the age as shown below.
<LinearLayout
    xmlns:android="http://schemas.android.com/apk/res/android"
    android:layout_width="match_parent"
    android:layout_height="wrap_content"
    android:orientation="vertical">

    <TextView
        android:id="@+id/user_name"
        android:layout_width="match_parent"
        android:layout_height="wrap_content"
        android:textSize="25sp"
        android:padding="8dp"
        android:layout_marginStart="10dp"/>

    <TextView
        android:id="@+id/iuser_age"
        android:layout_width="wrap_content"
        android:layout_height="wrap_content"
        android:textSize="20sp"
        android:padding="8dp"
        android:layout_marginStart="10dp"/>

</RelativeLayout>
Creating the Adapter
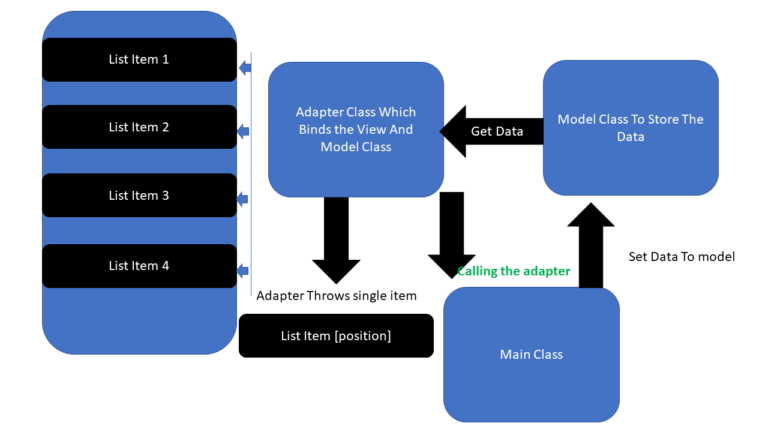
An Adapter is what associates your data with the Viewholder views. The Viewholder and the Adapter work together to determine how the data is displayed. The Adapter retrieves data from a data source and passes it to the Viewholder which then updates the views it currently holds. Below is a graphical illustration of how they work together.
Create the Adapter class
To create a UserAdapter in Kotlin, start by creating a new Kotlin file called UserAdapter. In this file, define a class named UserAdapter takes in a list of data to display and ensures it extends RecyclerView.Adapter. As part of extending the RecyclerView.Adapter class, you need to pass your ViewHolder class as a type parameter. As the Viewholder and the User class have not been created, an error will be shown. Don't worry, we'll take care of that.
class UserAdapter(private val userList: Array<Users>) :
    RecyclerView.Adapter<UserAdapter.UserViewHolder>() {

}
Creating the Viewholder
Construct an inner class called UserViewHolder that extends RecyclerView.ViewHolder. A RecyclerView's single-item view is represented by a ViewHolder. Create two private userName and userAge TextViews as private properties using the itemView argument.
Create a bind function that takes a User object as a parameter and binds the data from the User object to the userName and userAge TextViews in the ViewHolder. Specifically, it sets the userName TextView to the user's name and the userAge TextView to the user's age.
class UserViewHolder(itemView: View): RecyclerView.ViewHolder(itemView){

private val userName:TextView = itemView.findViewById(R.id.user_name)

private val userAge:TextView = itemView.findViewById(R.id.user_age)

  fun bind(user: User){
    userName.text = user.name
    userAge.text = user.age.toString()
  }
}
Implementing the RecyclerView override method
After the adapter class is defined, there are three methods to be overridden since it extends the "RecyclerView.Adapter" class. Those methods are:
- onCreateViewHolder: This method is called whenever the
RecyclerViewwants to create a newViewholder. It is in charge of initializing and inflating theViewHolderand its associatedView. It takes our created item layout to make an instance of a view for each item in a list.
override fun onCreateViewHolder(parent: ViewGroup, viewType: Int): UserViewHolder {
  val view = LayoutInflater.from(parent.context)
  .inflate(R.layout.user_item, parent, false)
  return UserViewHolder(view)
}
- onBindViewHolder: The
RecyclerViewcalls the method when it wants to fetch appropriate data and uses the data to fill in the view holder's layout. For instance, if theRecyclerViewdisplays a list of names, the function might select the right name from the list and populate the TextView widget of the view holder.
override fun onBindViewHolder(holder: UserViewHolder, position: Int) {
  holder.bind(userList[position])
}
- getItemCount:
RecyclerViewuses this method to calculate how large the dataset is. In other words, it is used to know the total number of items in a list.
override fun getItemCount(): Int {
  return userList.size
}
The complete adapter code
class UserAdapter(private val userList: Array<User>) :
    RecyclerView.Adapter<UserAdapter.UserViewHolder>() {

    override fun onCreateViewHolder(parent: ViewGroup, viewType: Int): UserViewHolder {
        val view = LayoutInflater.from(parent.context).inflate(R.layout.user_item, parent, false)
        return UserViewHolder(view)
    }

    override fun onBindViewHolder(holder: UserViewHolder, position: Int) {
        holder.bind(userList[position])
    }

    override fun getItemCount(): Int {
        return userList.size
    }

    inner class UserViewHolder(itemView: View) : RecyclerView.ViewHolder(itemView) {
        private val userName: TextView = itemView.findViewById(R.id.user_name)
        private val userAge: TextView = itemView.findViewById(R.id.user_age)

        fun bind(user: User) {
            userName.text = user.name
            userAge.text = user.age.toString()
        }
    }
}
Populating Data and binding views
To begin populating data, let's start by creating a model class called User that will act as a blueprint for our user objects. Make a new Kotlin file called User.kt. Within this file, define a data class named User with properties that represent the attributes of a user. For our purposes, we'll include properties for name and age.
data class User(val name: String, val age: Int)
After this is done, head over to the MainActivity class. This is where we connect all the dots and display our data.
Create a private property userAdapter of type UserAdapter in the MainActivity class.
class MainActivity: AppCompatActivity() {
    private lateinit var userAdapter: UserAdapter

    // Rest of your code...
}
Next, create a data source function that returns a list of User objects. Inside the createDataSource function, create an empty mutable list using mutableListOf<User>().
Add User objects to the list using userList.add(User("Name", age)). Add as many users as needed.
private fun createDataSource(): List<User> {
        val userList = mutableListOf<User>()
        userList.add(User("John Doe", 25))
        userList.add(User("Jane Smith", 30))
        userList.add(User("Adam Johnson", 28))
        // Add more users as needed

        return userList
 }
In the onCreate method, call the createDataSource function to obtain the list of users and assign it to a variable, userList. Create a new instance of UserAdapter and pass the userList as a parameter to the constructor, assigning it to the userAdapter property.
override fun onCreate(savedInstanceState: Bundle?) {
        super.onCreate(savedInstanceState)
        setContentView(R.layout.activity_main)

        val userList = createDataSource()
        userAdapter = UserAdapter(userList)

        //Rest of your codes...

}
Find the RecyclerView in the layout using findViewById(R.id.recyclerView), Then set the adapter of the RecyclerView to the userAdapter. You can also set the layout manager for the RecyclerView.
// Assuming you have a RecyclerView with id "recyclerView" in your activity_main.xml
        val recyclerView: RecyclerView = findViewById(R.id.recyclerView)
        recyclerView.adapter = userAdapter
        recyclerView.layoutManager = LinearLayoutManager(this)
The complete MainActivity code
class MainActivity : AppCompatActivity() {
    private lateinit var userAdapter: UserAdapter

    override fun onCreate(savedInstanceState: Bundle?) {
        super.onCreate(savedInstanceState)
        setContentView(R.layout.activity_main)

        val userList = createDataSource()
        userAdapter = UserAdapter(userList)

        // Assuming you have a RecyclerView with id "recyclerView" in your activity_main.xml
        val recyclerView: RecyclerView = findViewById(R.id.recyclerView)
        recyclerView.adapter = userAdapter
        recyclerView.layoutManager = LinearLayoutManager(this)
    }

    private fun createDataSource(): List<User> {
        val userList = mutableListOf<User>()
        userList.add(User("John Doe", 25))
        userList.add(User("Jane Smith", 30))
        userList.add(User("Adam Johnson", 28))
        // Add more users as needed

        return userList
    }
}
Now launch the app to see how it works. When you launch the application, you should notice the changes. There are ways to enhance the RecyclerView and one of them includes item clicks.
Handle item clicks
To refine our RecyclerView, we will add a clickListener to detect the user's clicks on an item and display a Toast message. To add clickListener, Modify the UserAdapter class and the MainActivity class.
- Modify the
UserAdapterconstructor to accept an additional parameter, onItemClick, which is a lambda function that handles user item clicks.
class UserAdapter( private val userList: List<User>,
 private val onItemClick: (User) -> Unit) : RecyclerView.Adapter<UserAdapter.UserViewHolder>()
- Inside the
onBindViewHoldermethod ofUserAdapter, the click listener is set on the item view usingholder.itemView.setOnClickListener { onItemClick(user) }. This invokes the onItemClick lambda function with the clicked User object.
override fun onBindViewHolder(holder: UserViewHolder, position: Int) {
        val user = userList[position]
        holder.bind(user)
        holder.itemView.setOnClickListener { onItemClick(user) }
    }
- In the MainActivity, the
userAdaptercreation now includes theonItemClicklambda function that shows a toast message indicating the clicked user's name.
userAdapter = UserAdapter(userList) { user ->
            // Handle user item click
            Toast.makeText(this, "Clicked on user: ${user.name}", Toast.LENGTH_SHORT).show()
        }
When a user item is clicked, the onItemClick lambda function is triggered, displaying a toast message with the name of the clicked user.
Conclusion
In conclusion, this comprehensive article has provided Android developers with a meticulously outlined, step-by-step process for seamlessly integrating the powerful RecyclerView component into their Android applications. By diligently following the prescribed procedures, developers can elevate the user experience to new heights, harnessing the potential of RecyclerView to construct dynamic lists that boast enhanced performance and unparalleled flexibility.
With the aid of this invaluable resource, developers are empowered to fully exploit the vast capabilities of RecyclerView, enabling them to craft visually stunning Android applications that captivate users and leave a lasting impression. However, it is important to note that achieving such mastery requires a combination of skill and extensive research.
We extend our sincere gratitude for the time you have invested in reading this article. We trust that the knowledge gained will prove invaluable in your future endeavors.